Showing posts with label Tutorial. Show all posts

Monday, September 10, 2012

How To Make A Diaper Cake


A few weeks ago, I had the joy of hosting a baby shower for a coworker. You can see all of the beautiful things from the shower HERE. The shower had a sports theme, and I made a diaper cake for the expecting mother. As mentioned in my previous post, I wanted to show you how easy it is to make a diaper cake. It is an extremely easy but cute way to decorate for a baby shower or give as a shower gift.

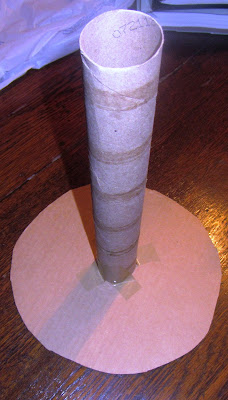
First, I cut a circle out of cardboard (I used an old cardboard box). I then taped the dowel from a paper towel roll upright onto the cardboard circle.


I found these plastic hair bands from Wal-Mart. I rolled up each diaper and wrapped one of the plastic bands around each one.


I then took the rolled diapers and started placing them in rows around the paper towel roll. 


Once the rows got too large for the diapers to stand upright on their own, I wrapped a large rubber band around the rows of diapers. I then continued to stuff rows of diapers inside the rubber band until you could no longer see the cardboard circle underneath. Make sure at least some of the cardboard circle is underneath the outside row of diapers, otherwise, it will be difficult for them to stay in when carried.


I repeated this process again with a second tier of diapers, then a third, wrapping each tier with a large rubber band.


Once I completed the diaper tower, I wrapped ribbon around each tier, covering the rubber bands. I used fabric glue to secure the ends of the ribbon together. It’s important to get the ribbon tight enough around each tier that it won’t slide down. Don’t worry if the glue seeps and shows through the ribbon. This will be covered up.


I found some wrist rattles that I wrapped around the ribbon where I had glued it together. I was originally going to get a wooden football, baseball, and basketball from Michael’s that were already painted and glue them to the ribbon, but they were out of footballs and baseballs. Plan B was using the rattles, which worked about pretty well.


I found some shredded paper basket filler at Wal-Mart for 99 cents a pack. I tucked the paper into the diapers on the top of each tier. This is a little more expensive at Michael’s, which has bigger packs of the shredded paper, but I didn’t even use an entire pack that I bought from Wal-Mart.  


Here’s another diaper cake I made for my sister’s shower that’s a little different. I hid where I had glued the ribbon together in the back and also made a bow using two colors of wired ribbon for the top. I’ve found that it’s easier to make one for a girl shower, simply because there are more frilly, girly items to use to decorate it. I hope you have enjoyed this tutorial on how to make a diaper cake!


Linking Up With:


Pin It

Tuesday, August 28, 2012

Furniture Fit for a Princess: Upcycled Dress Up Cabinet


Have you ever had times where you have a million projects going on at once but can’t seem to finish one? That’s been my situation for almost three weeks now. I have a list of things to do that’s a mile long, but I haven’t been able to cross anything off…until now. I finally finished something! And boy,  was it worth it!
I currently keep all of my daughter’s dress up clothes in a box on shelves in her room. It makes it difficult for her to find matching pieces and is just so disorganized. There is absolutely no more room in her closet to hang them up, so I decided to make a dress up cabinet from an old dresser I found at a thrift store. Here’s a tutorial of how I created it.

I found this dresser at a thrift store for $10. It’s made of particle board with a wood laminate cover, but it will do the trick.
First, I removed the drawers and knocked out the wood holding the drawers with a hammer. The metal track that the drawers slid on were stapled into the wood.

I had to go to Home Depot to buy a tack remover to pry the staples out because the darn things wouldn’t budge.


Once that was finished, I sanded the piece and used wood puddy to fill in any staple or nail holes. I sanded again.

I then used a spray primer to prime the piece. I was originally going to paint it a bright pink, so I got a gray primer. It was a big mistake when I changed my mind and decided to go with white. It took about four good coats to get it where I wanted.  

I bought some Behr painter and primer in one to paint the inside pink. That actually took very well since there was no laminate on the inside.
I painted “Let’s Play Dress Up” at the bottom.

I hung a dowel rod at the top to hang the costumes.

At first I was going to glue it in, but the glue wouldn’t hold on the paint. I then drilled screws in the sides to hold it, which left ugly screws. I tried painting them but it just wouldn’t cut it.
So, I went to plan B and bought two jeweled crown pins to cover the screws. I removed the pins and glued the crowns over the screws. Worked like a charm.


I was going to make a mirror out and frame it with an old spray painted frame to hang on the side, but  I couldn’t find a mirror that was already cut to fit. I found this mirror at Hobby Lobby for $9.99 which I purchased for $6.00 with a coupon. Because it was cheap, it was also light and hung on the side of the cabinet nicely. The color also matched pretty well, so I didn’t have to paint it.


On the other side, I screwed in a hook which I painted pink to match the inside of the cabinet.
When I FINALLY finished, it looked great, and was ready for all of my little munchkins dress up clothes and accessories!


Here’s the breakdown of what it cost me to make:
Dresser: $10
Rod: $1.49, Michaels
Mirror: $6.00 (with 40% off coupon), Hobby Lobby
Crown Screw Covers: $3.58 (with 2 40% off coupons) Hobby Lobby
Behr Paint Sample in Pink: $2.94, Home Depot
Hook: $3.50 (50% off sale), Hobby Lobby
Primer: 3.98, Home Depot
Spray Paint: $3.87, Home Depot (used nearly 2 cans, but already had one on hand)

Grand Total: $35.38


I was featured!


Linking Up With:


TDC Before and After


Pin It